

Patient Education A to Z
Pediatric tracheostomy
Tracheostomy surgery
The procedure
A tracheotomy is a small opening, also known as the stoma, made in the windpipe (trachea). The tracheostomy tube will be placed in the stoma. This surgical procedure is done under general anesthesia in the operating room.
The tracheostomy tube will be sutured in place to prevent accidentally moving the tube during the healing period. Your child will be transferred to the Intensive Care Unit (ICU) after surgery for recovery. Your child will be connected to the ventilator until they wake up from anesthesia. Some children need the ventilator for a longer amount of time.
What to expect during the first week after tracheostomy surgery
Your child will need rest after surgery. Expect that your child will be sleepy after the procedure due to the anesthesia. Anesthesia can linger in the system for 24 hours. Your child also may need pain medication to keep them comfortable.
The ICU team will decide when your child is ready to come off the ventilator.
Expect that your child will need a lot of suctioning of secretions from the tracheostomy tube. It is normal for your child to produce mucous.
The ENT team will perform the first tracheostomy tube change 5 to 7 days after the surgery. At that time all stitches will be removed.
Tracheostomy tubes
The size and brand of the tracheostomy tube will be based on the age, size, and needs of your child.
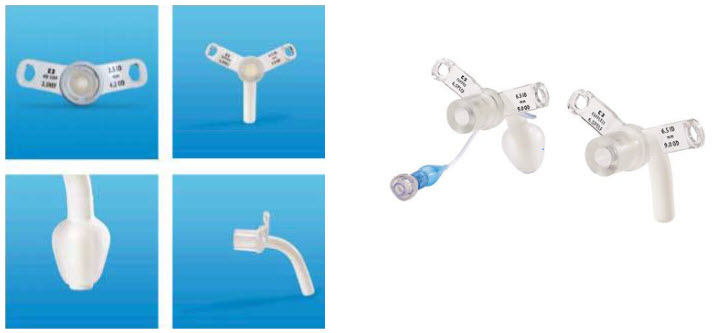
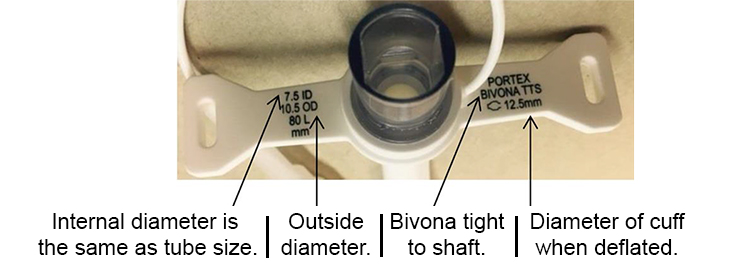
- Inner diameter (ID) – represents how large the inside portion of the tube is circumferentially.
- Outer diameter (OD) – represents how large the outside portion of the tube is circumferentially.
- Length – represents the length of the tube that will be inside your child’s windpipe.
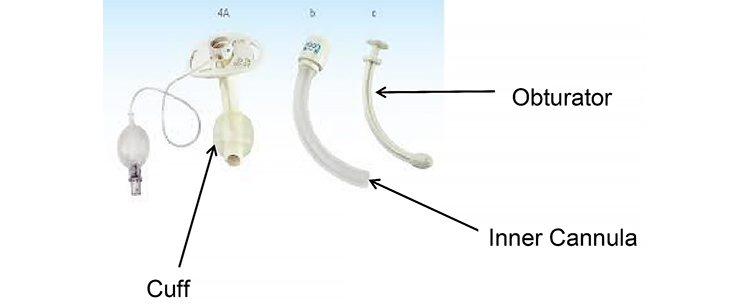
- Obturator – a guide that is only put in the inner part of the tube for the purpose of tracheostomy insertion into the stoma. Once the tracheostomy is placed in the stoma, the obturator is immediately removed.
- Cuff – sometimes referred to as the balloon. Your child may need a cuff to seal the windpipe if he or she uses a ventilator for breathing.
- Flanges – sometimes referred to as the ‘faceplates’ or ‘trach plates’ of the tracheostomy tube.
- Inner cannula – used only with adult sized tracheostomy tubes that are dual cannula. The inner cannula is changed daily when you are at home. Dual cannula systems needs less tracheostomy tube changes.
Humidification
When air enters the body normally, it passes through the nose and mouth where it is filtered, warmed and moistened. This protects the lining of the lungs and keeps the airway moist. A moist environment helps to make sure that mucus does not get dry and hard in the windpipes.
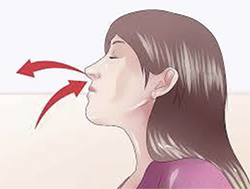
A tracheostomy tube does NOT filter, warm and moisten the air. Adding moisture to the air your child breathes will keep the lungs moist, and keep mucus loose.
Humidification is very important for a new tracheostomy tube. If your child does not get enough humidity to the airway, mucus may dry and harden, blocking your child’s airway.
Humidifiers are often used to add moisture to the air your child breathes in through his/her tracheostomy tube.
Tracheostomy mist collar

A tracheostomy mist collar is one way to humidify the air going through the tracheostomy tube into your child’s windpipes.
Supplies needed for a tracheostomy mist collar:
- Air compressor
- Large flexible tubing
- Tracheostomy collar
- Drainage bag
- Sterile or distilled water for the air compressor
Your insurance company will determine the tracheostomy mist machine brand that your child will receive. Your brand may not need all of these parts.
Steps to use the tracheostomy mist collar:
- Set system as shown by the supplier who delivers the supplies to your home
- Place tracheostomy collar over the tracheostomy tube opening
- Turn on mist
- Pay attention to the thickness of mucus, and adjust humidity to keep mucus loose but not too thin and runny.
- Empty water from the tubing as needed
- Use only as your child’s doctor recommends
Helpful hints: Warmed humidification is best as cold mist can be irritating to the windpipes. When you first get home you might need to use the mist humidifier all day and night. Eventually, humidification will only need to be used when your child is sleeping.
When the weather is hot or dry, or the air quality is poor, your child may need more humidification. During illness, your child might also need more humidification to keep mucus loose. If mucus is too thin and runny it can be a constant irritation to your child’s windpipes and make them cough a lot.
Heat Moisture Exchanger (or artificial nose)
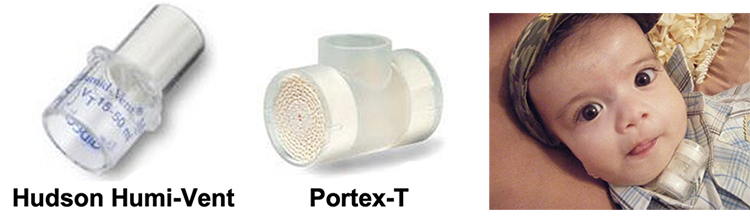
A Heat Moisture Exchanger (HME) or artificial nose is a portable humidifier. This device uses the warm air that your child breathes out and traps it. When your child breathes in again, the trapped warm moist air is put back into the lungs.
The HME or artificial nose can be placed right on the tip of the tracheostomy tube.
Helpful hints: If using the artificial nose, do not wash it. It cannot be rinsed and reused. The paper inside used to filter the air will expand and block airflow to your child. For this reason, you should not use the artificial nose if your child has a lot of mucus.